Uploading Your Designs
Uploading your creative, engaging, and original designs on Spark is as easy as 1-2-3. Start by setting up your profile. Once that’s done, upload your designs. As soon as your designs are approved, voilà! You’re in business.
Please take time to read the steps below as we take you on step-by-step instructions to upload your designs, adjust them, add more, remove some, and much more. We’ve also included a few important pointers on eye-catching and significant titles, tags, and descriptions for your designs.
Adding and Aligning Designs
You have finished a new original design, saved it on your computer, and you’re eager to upload it to your Spark portfolio. We’re as excited as you are.
1. Click on your profile photo in the upper right corner of your page. Click on the diamond shaped upload button to Upload New Design.
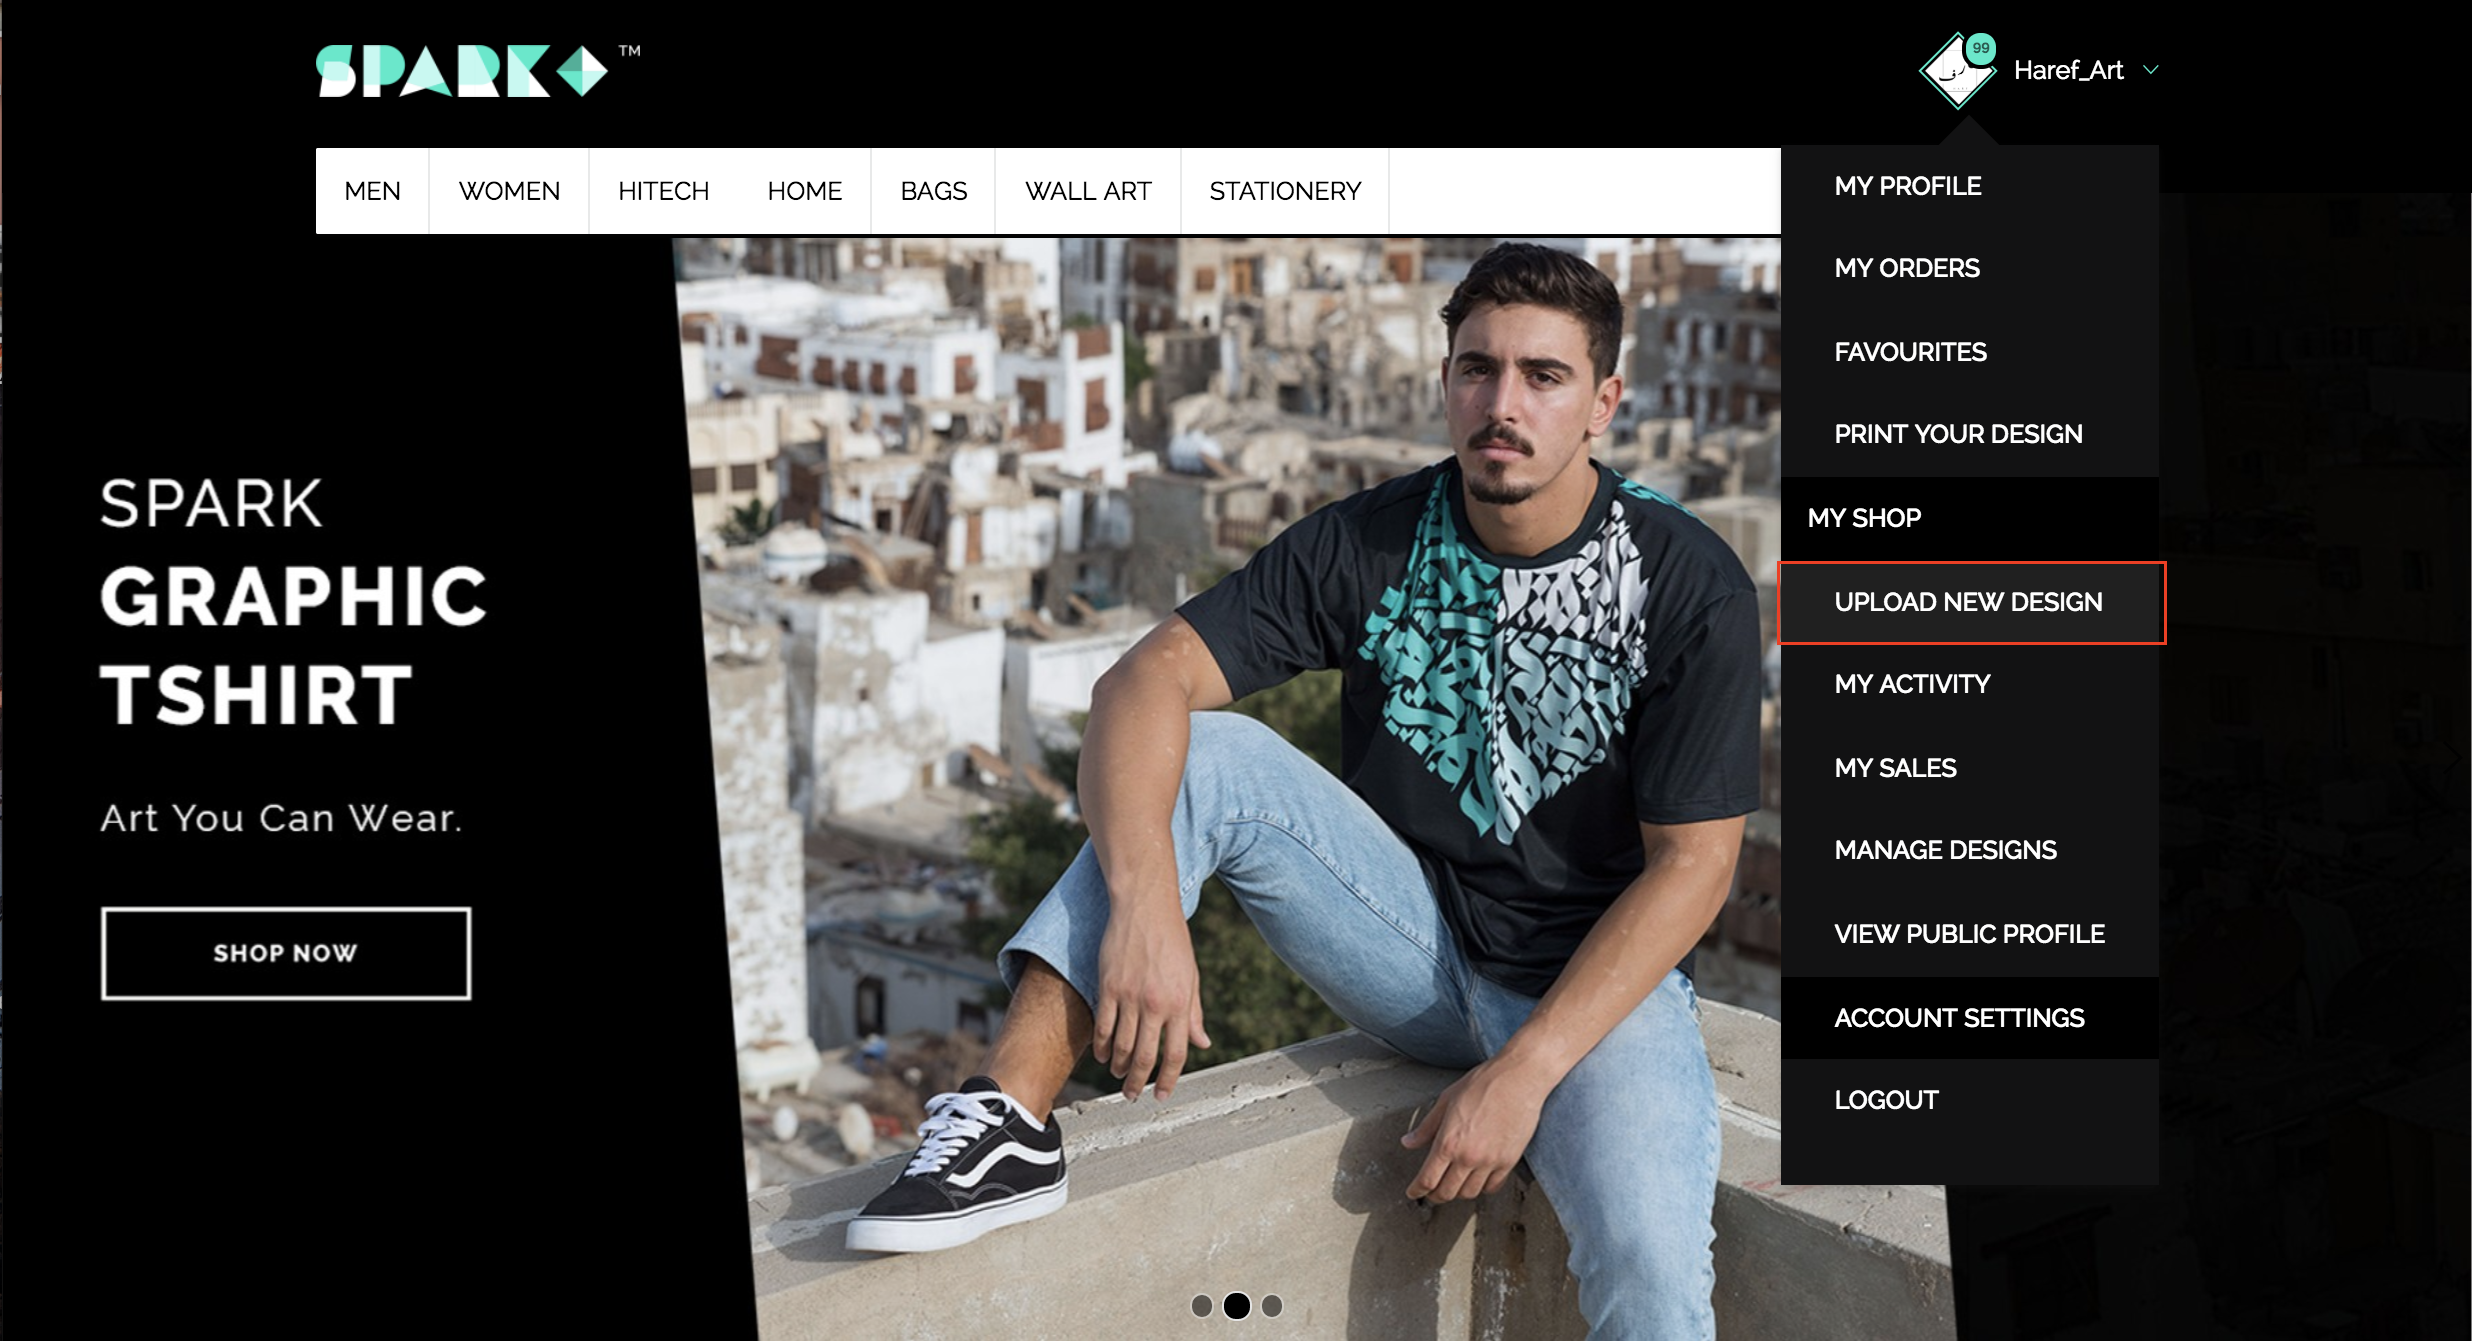
2. A new window will open prompting you to select a new design.Locate your new design on your computer and press Open.
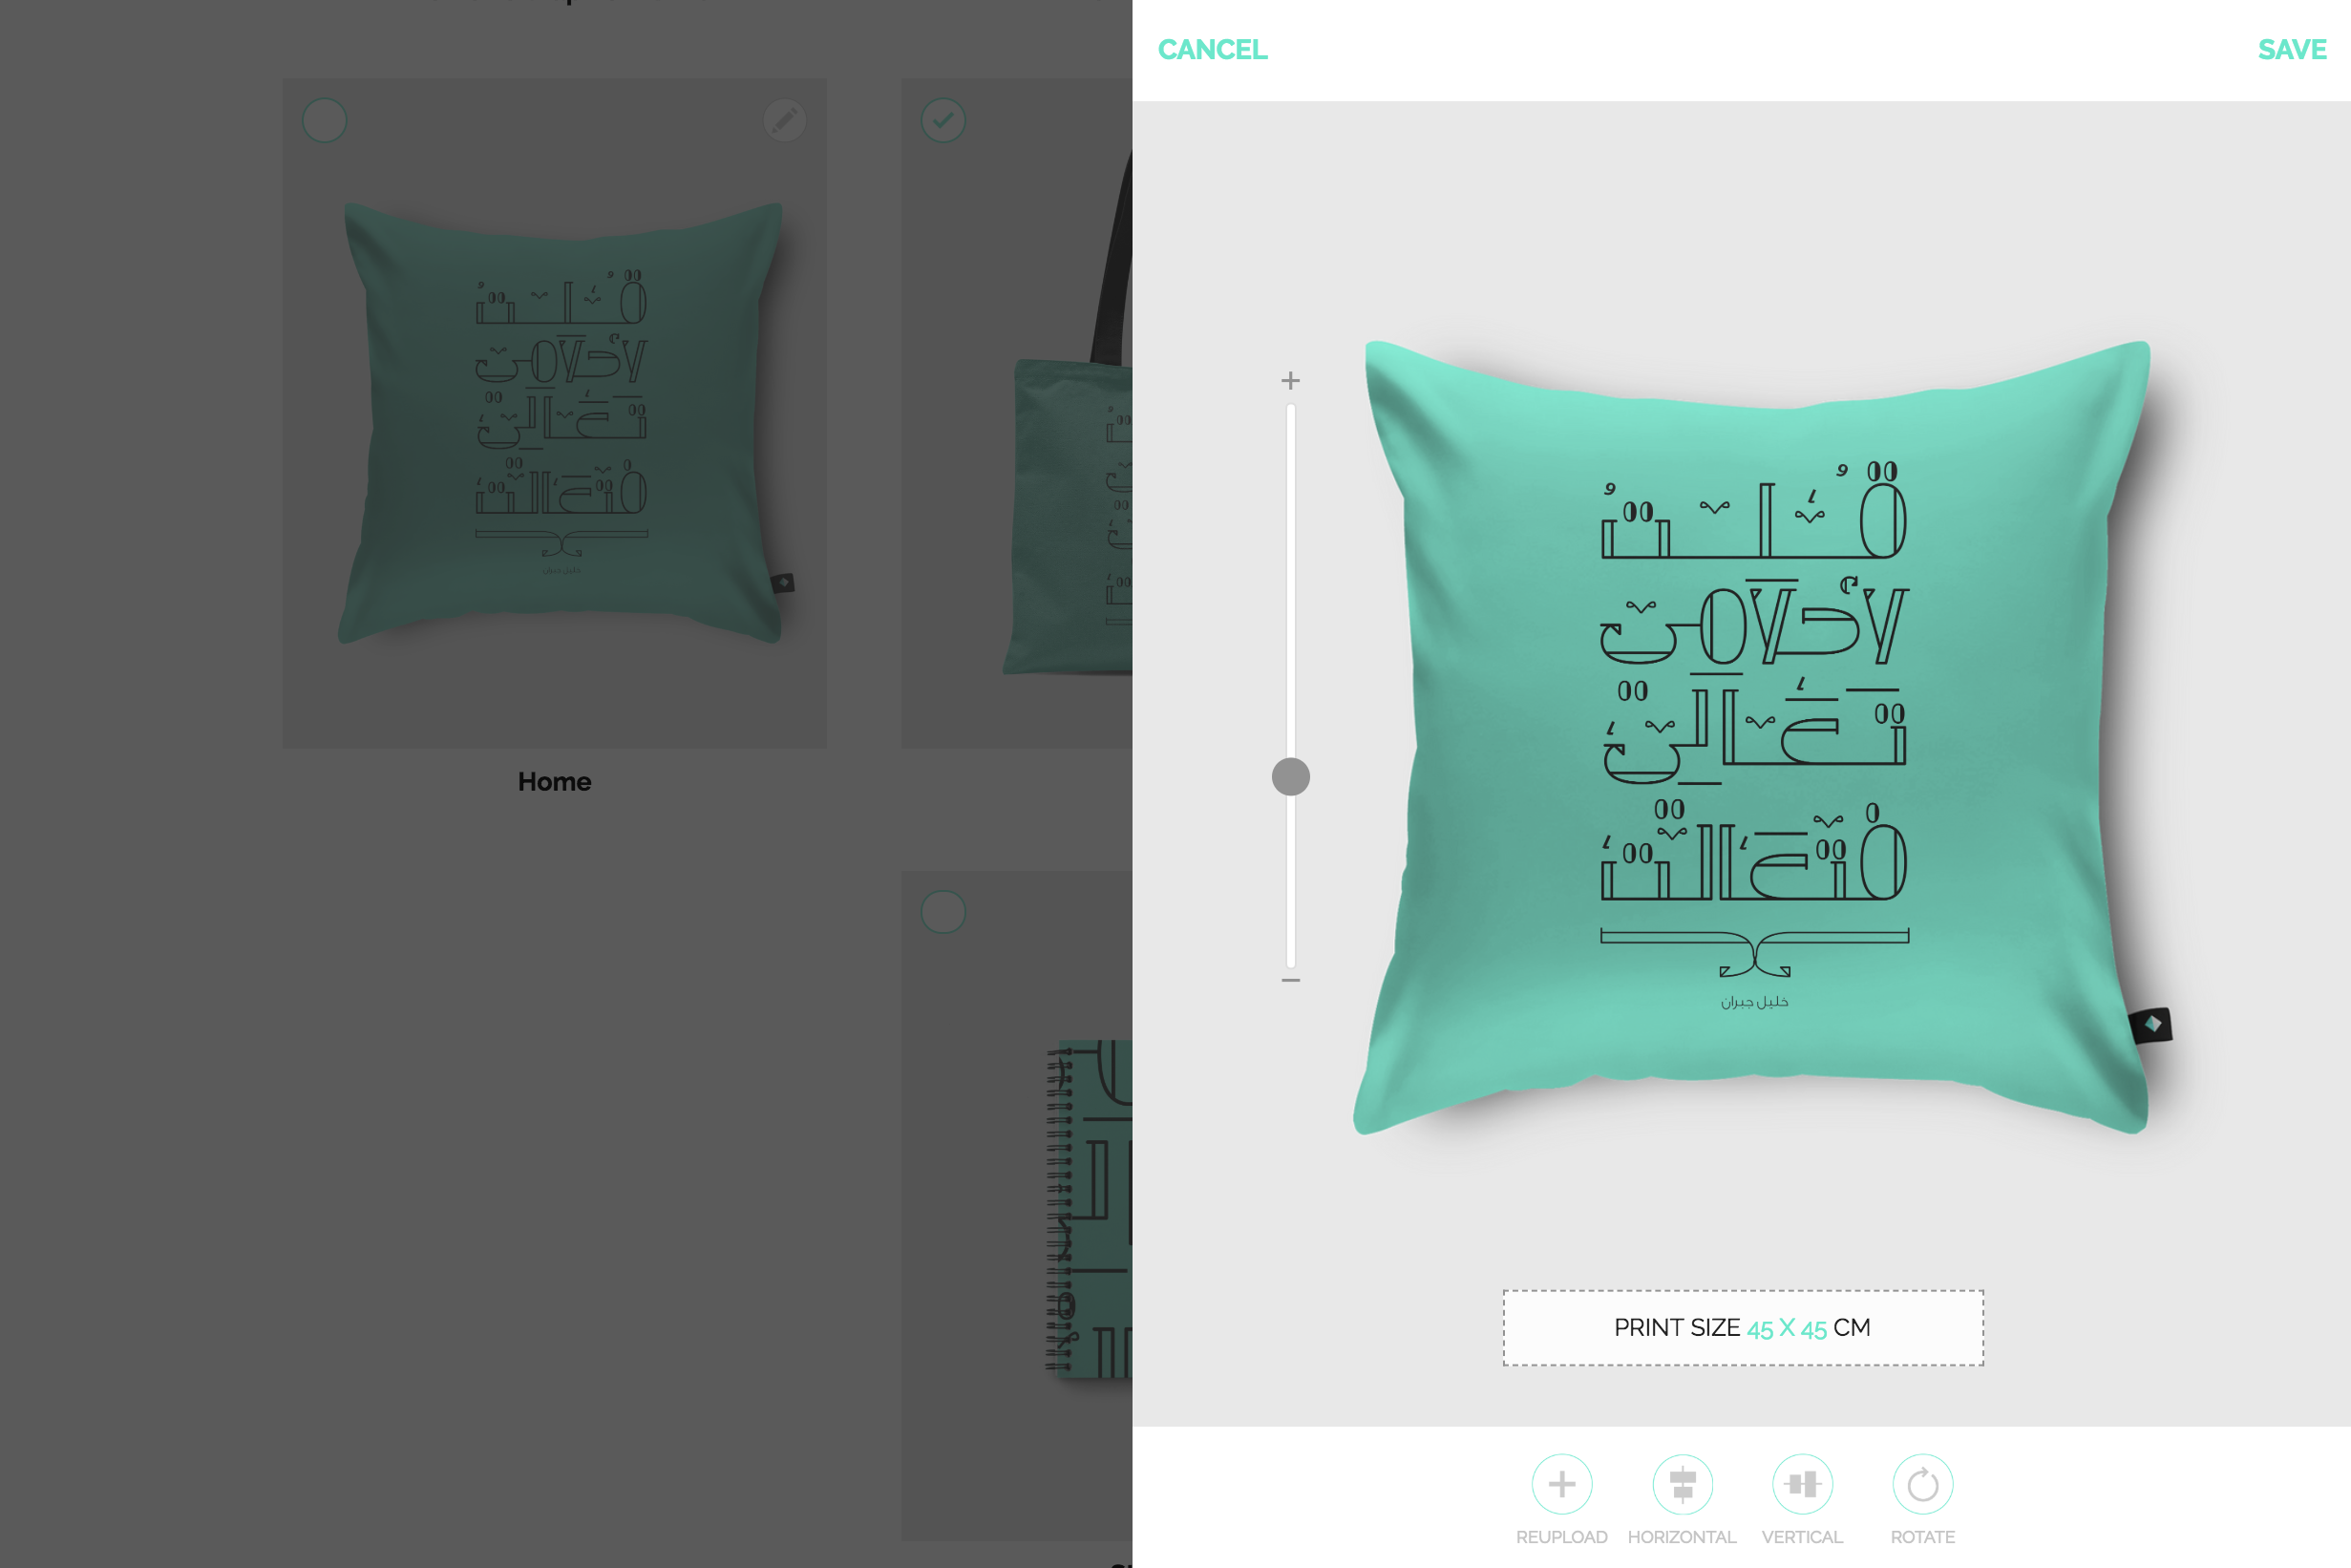
3. Once the upload is complete, a drop down menu will appear prompting you to Select Your Products. To add or select a Spark product to feature your design on, click on the checkmark on the upper left corner.
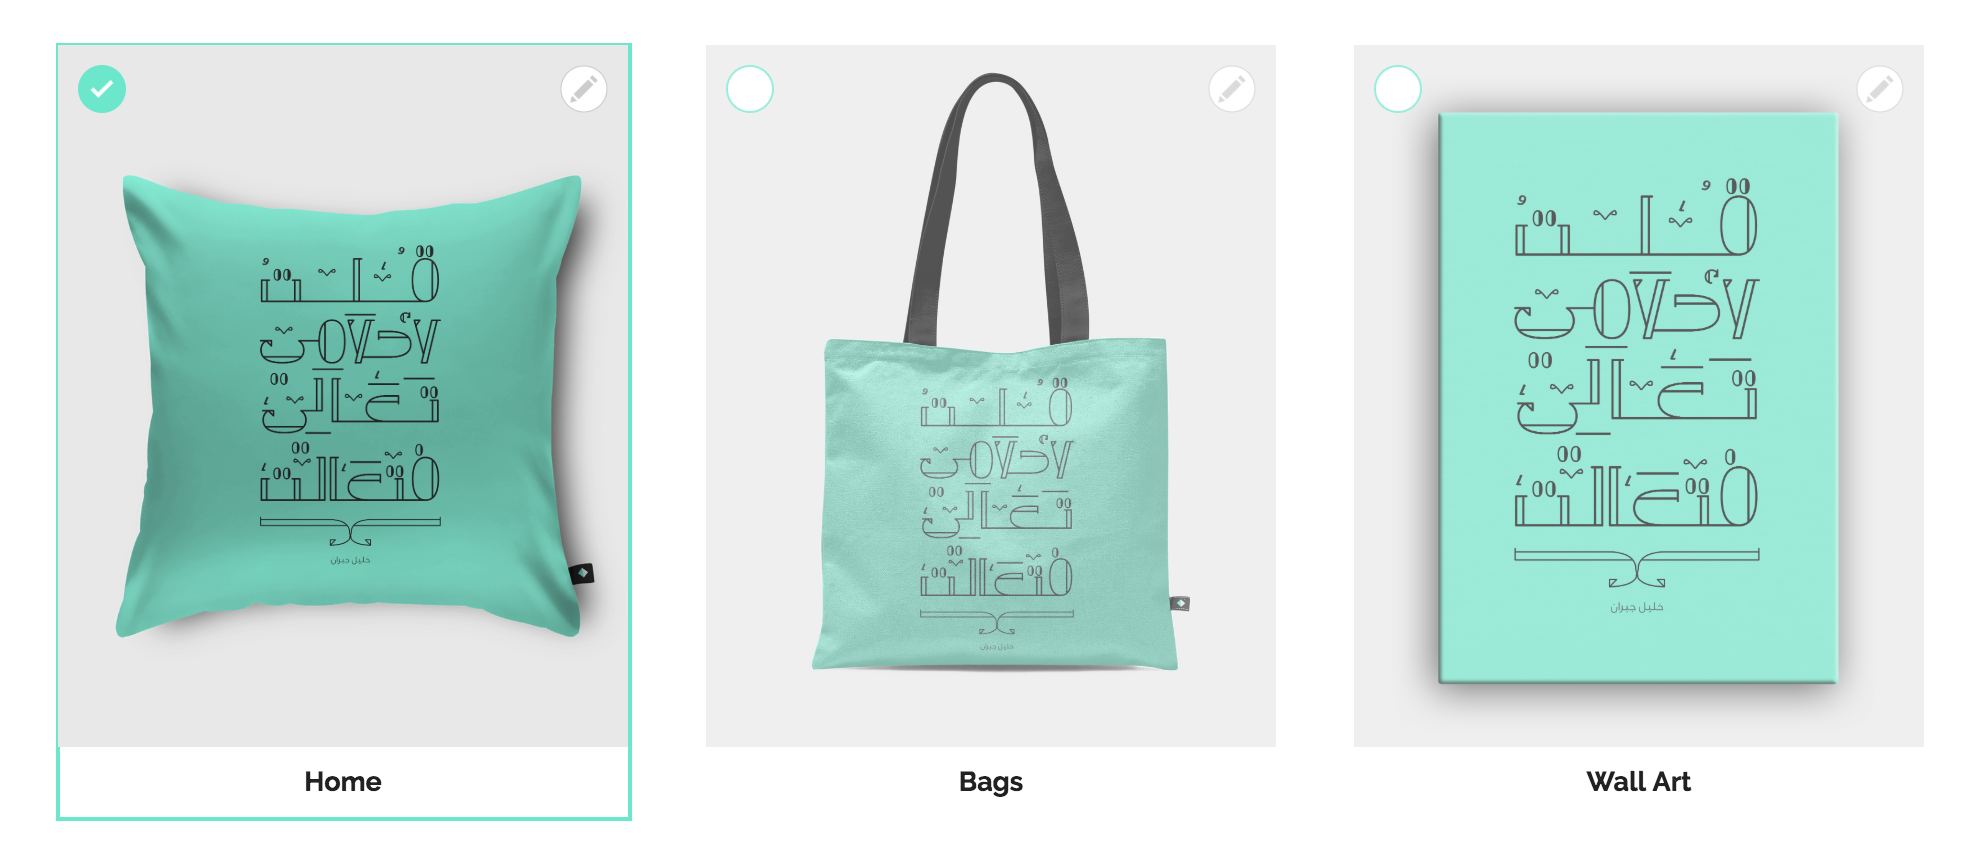
4. We love this part and so will you. It gives you a chance to see and adjust your design on the Spark product of your choice. To Edit your design on the selected product, click on the pencil icon on the upper right corner.
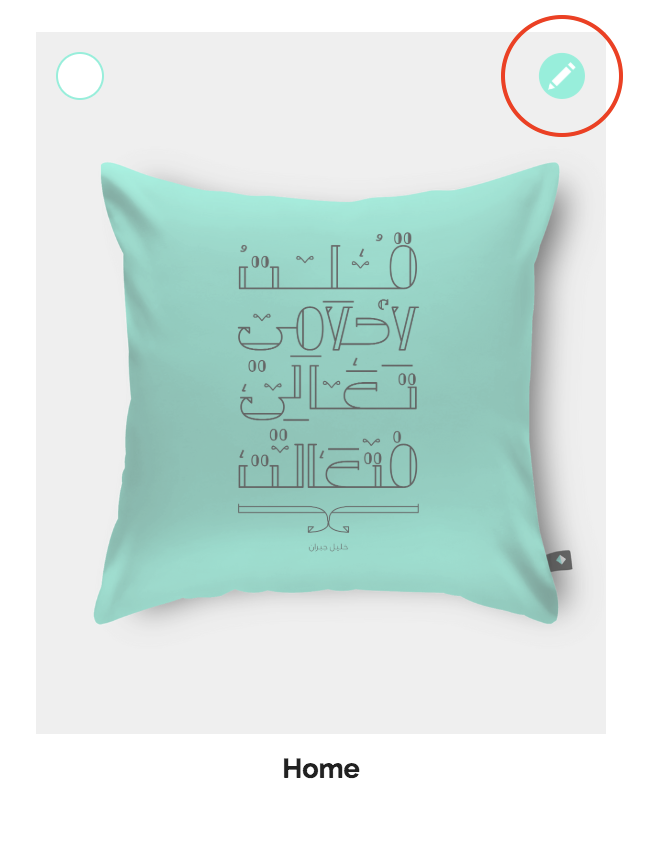
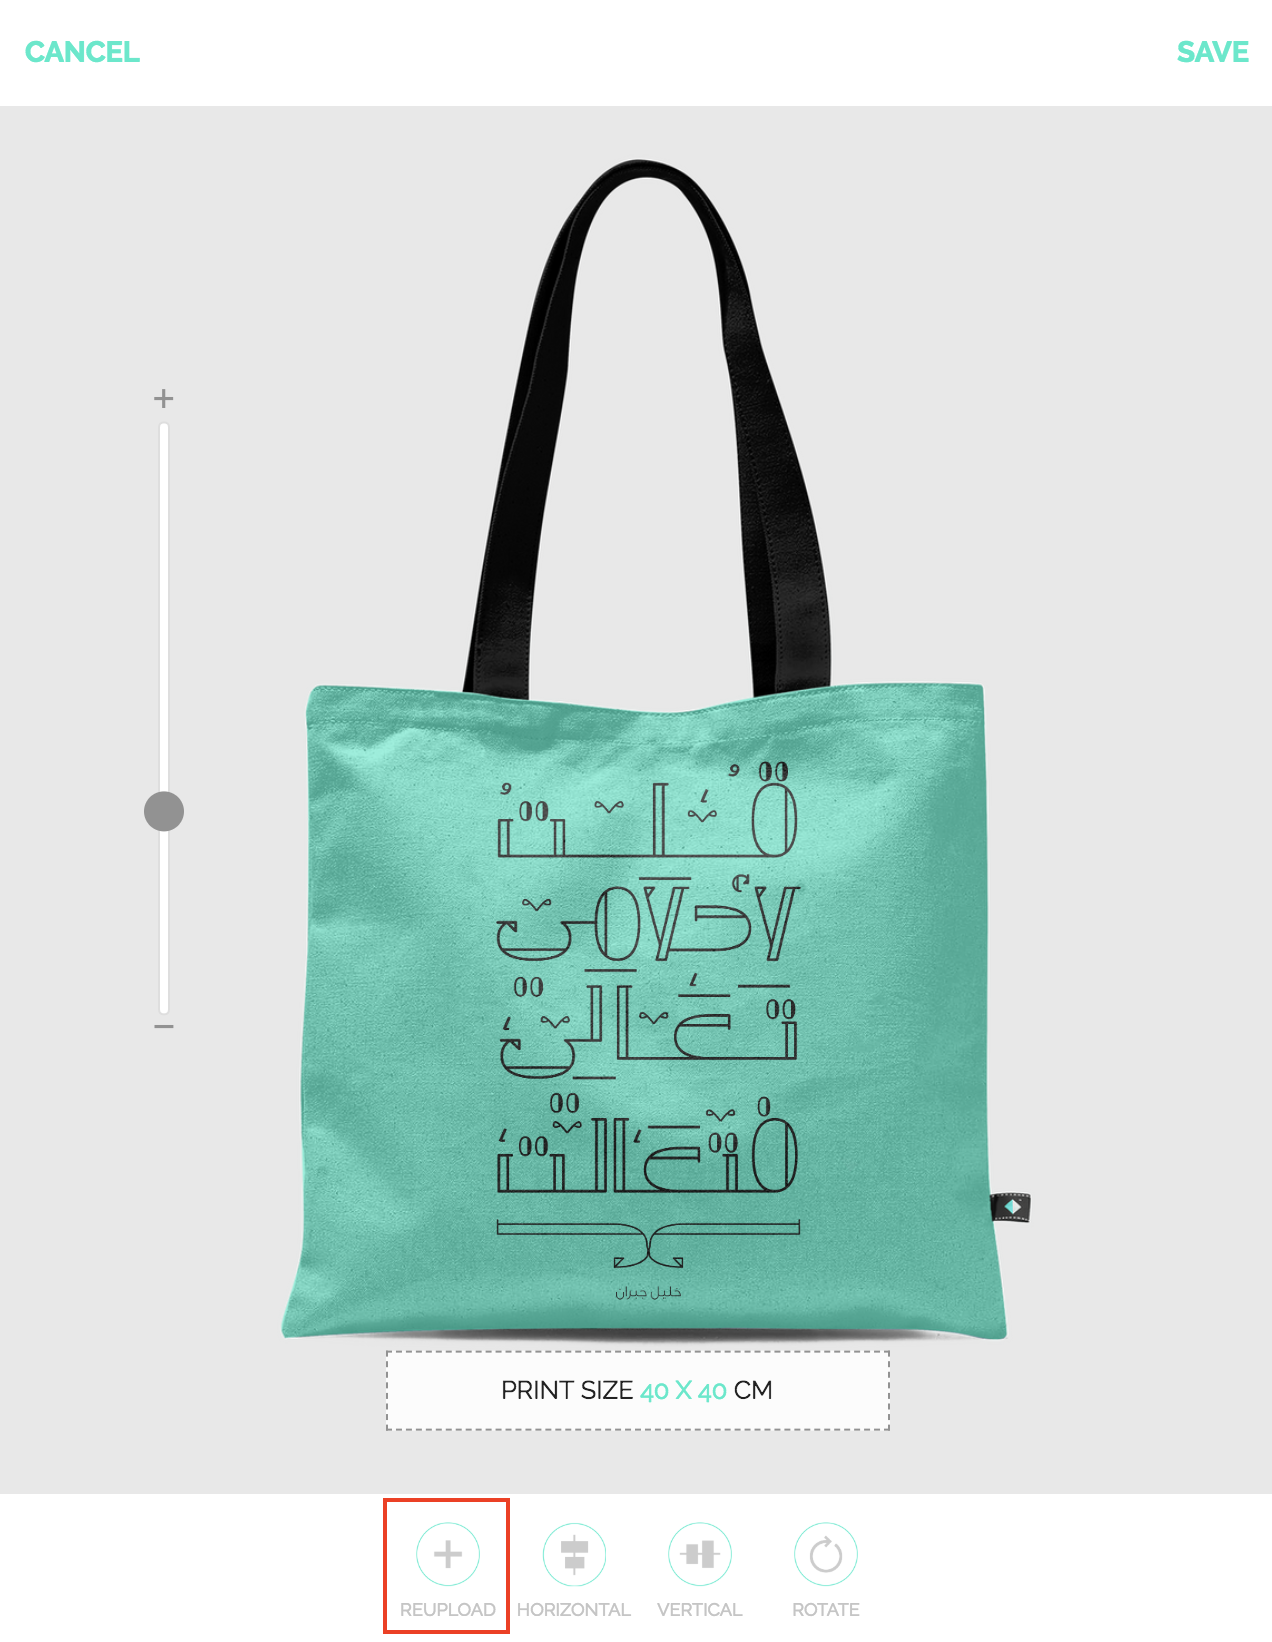
5 .Playtime continues as you move to Align, Rotate and Resize your design on the Spark products of your choice. For Tshirts, you have the added feature of a Default Setting for colors.
6. Re-uploading: when you review your work, you might realize you’re not happy about the way your design looks on that specific product. This is completely understandable. Designs sit differently on each product. Bear in mind when you choose products, apparel looks better with a design that has a transparent background, whereas designs with a background are better suited for graphic Tshirts. For pattern designs, consider aligning them with dresses. Replacing images is as easy as uploading them originally in the Uploader, You can re-upload at the Edit window - Press the Re-upload icon from the pop up box at the button. Choose the desire image from your computer, adjust the design if needed and hit Save changes.
7. Review your work one more time to make sure it is exactly how you want it to appear and is ready for Spark marketplace. Up until now, no one has seen your work but you. Once you are completely happy with the upload, click Save on the upper right corner.
Title, Type, Tags, and Public Settings
You have uploaded your design and you’re happy with how it looks on the Spark product/s of your choice, but what is the name of your design? Which Tags are best for it and which Work Settings?
Let’s walk you through the steps of naming and describing your design.
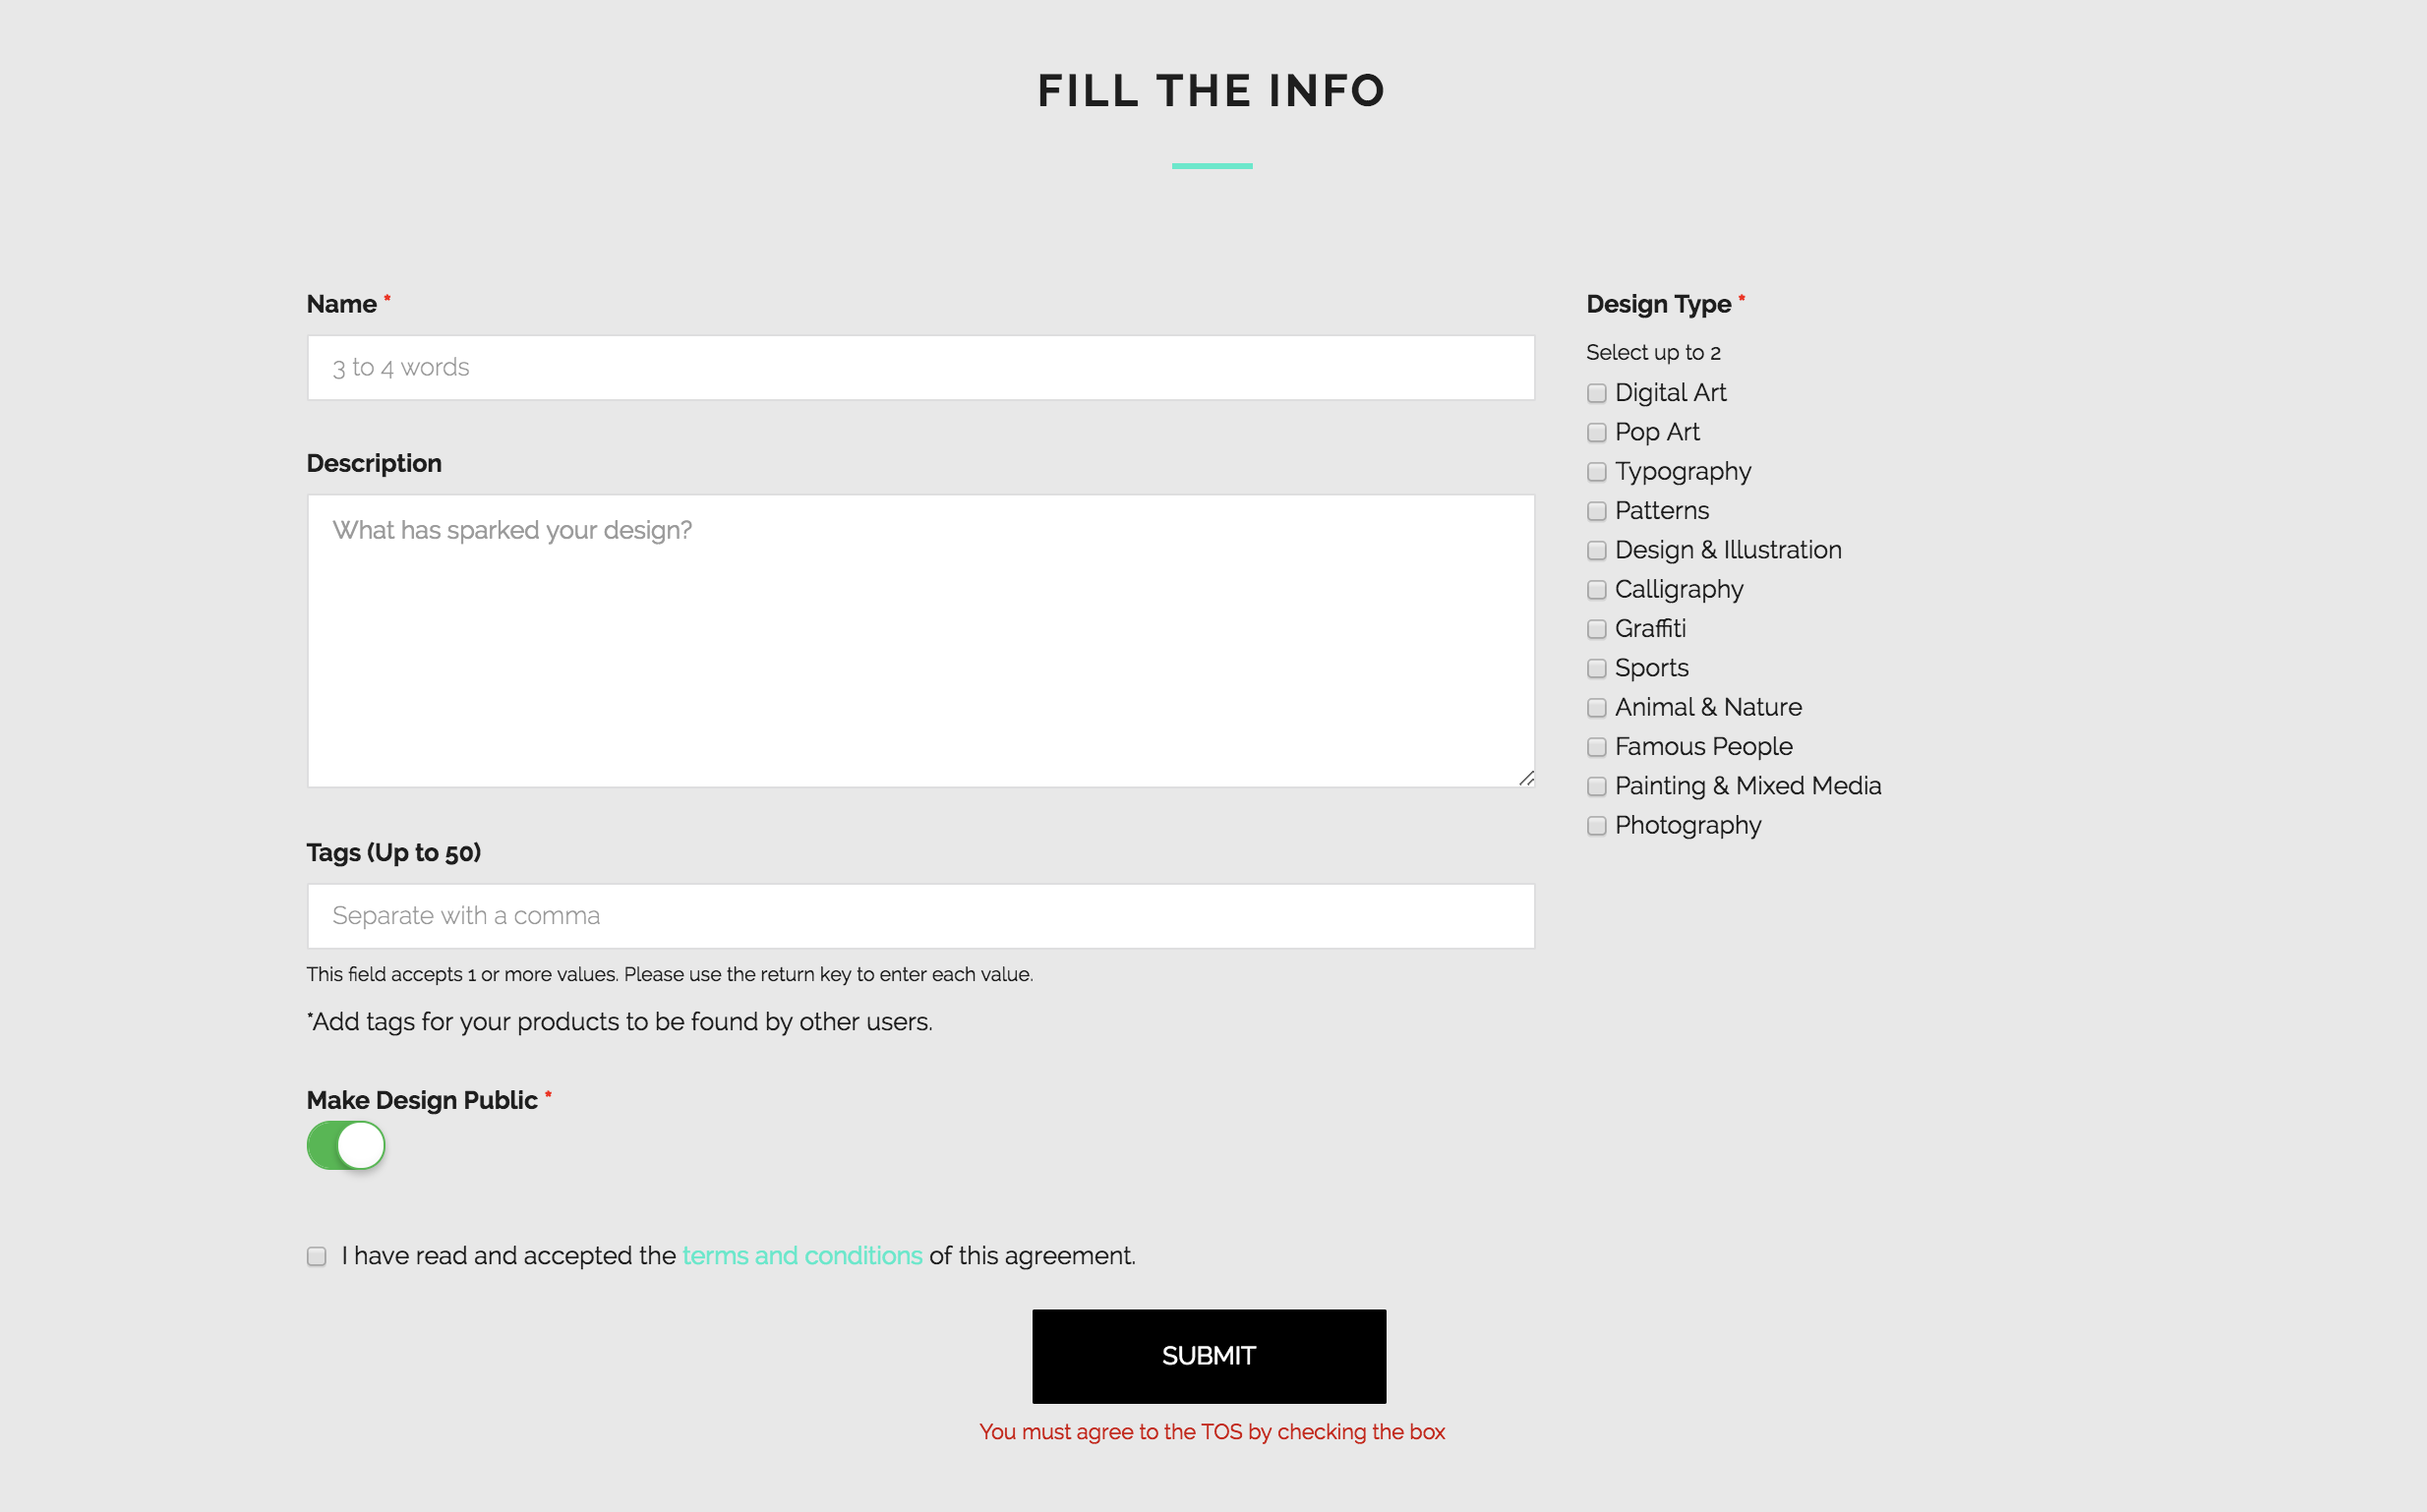
1. Title: From the Uploader section, scroll down to the bottom. Fill out the information. Think carefully and deeply of a name to give your design. Be selective when it comes to describing it. You want it to stand out from the rest. This is important because it directly affects how people view your work, how they relate to it, and how easily they are going to find it.
2. Tags: Spark supports both English and Arabic languages. We encourage you to add tags in these two languages whenever you can. Type the tags and click ENTER. Tags plays a crucial role in helping interested customers find your design.
3. Design Types: To make it easier and more feasible for followers and buyers to locate your design, it is always helpful to classify it under one or two types. Go ahead and choose two design types which best fit your specific piece of art.
4. Public Settings: How private is your design? We recommend that you make your designs available for all to view, but if you choose otherwise, your privacy will be respected and you will be the only one to view your design/s.
5. Terms & Conditions: And last but not least, click on the checkbox confirming you are the owner of the design and authorize us to sell it on Spark.
6. Review: It doesn’t hurt to give your uploaded design, your information, title, description, etc, a onceover. Double check everything and then hit SUBMIT.
You have successfully uploaded your design. How hard was that? Congratulations!
Note: All designs uploaded at Spark are subject to approvals. To learn more about our conditions, click on the link.
Dimensions & Format
Keeping Dimensions and Format in mind is essential to ensure that your designs will print really well on our products.
Please read the below pointers to find out all you need to achieve that.
Dimensions
We cannot emphasize enough the importance of high-resolution files to achieving excellent, clear prints.
Resolution is measured in pixels. We love pixels so much because we know how important they are. Pixels matter. So, pixel pixel all the way. Think of it as a family tree. If your first name was Pixel, your last name would be Resolution. And that, my dear, is permanent.
Product Dimension Requirements
We have identified specific dimensions to go with each product type to ensure a good quality print. Those dimensions reflect to the minimum resolution a file needs to have to be fit the requirements to be printed on a certain product. Please take time to review the information below to identify which resolution better fits your design and the product/s you choose to print it on.
Please bear in mind that:
- Images with resolution above 10Mb might cripple our site or slow it tremendously and therefore CANNOT be accepted on the site.
- DPI and PPI need to be at 150 pixel / inch.
Dresses
5250x7850 pixels. RGB Colors.
Tshirts/Hoodies
2875x3900 pixels. Use Cymk Colors. The file must be a PNG for transparencies to be saved.
Graphic T-Shirts
4134x3273 pixels. Use RGB Colors.
Tote Bags & Pillows
2657x2657 pixels. Use RGB Colors.
Phone Cases
1181 X 1890 pixels will cover the printable area. However, you can resize larger images to fit. Use RGB Colors.
Spiral Notebooks
874x1240 pixels. Use RGB Colors.
Art Frames, Canvas & Posters
A4 size: 1240 X 1772 pixels
A3 size : 1772 X 2480 pixels
A2 size : 2481 X 3484 pixels
A1 size : 3484 X 4961 pixels
Use RGB Colors for all Wall Art.
File Type
Files uploaded to Spark should ONLY be JPEG and/or PNG.
Managing Your Designs
Once you’ve fully uploaded your work, you can still make changes via the Managing your Portfolio page. This article will cover the basics of navigating the page, editing your designs and viewing your design approval status.
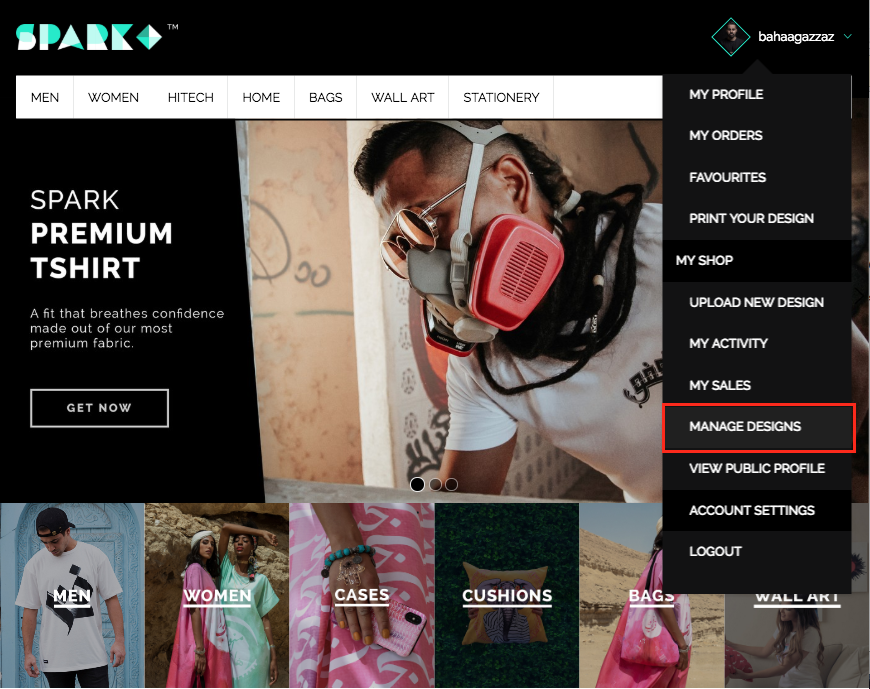
- First is first, make sure you are signed in to your Spark account.
- After you sign in, hover on your Spark Profile on the upper right corner of the header, a window will drop down.
- Click on Manage Designs.
Let’s take a closer look at the Manage Design page.
Design Status:
On the upper left of each design you can check the status of your design.
- Pending: means your design is under review from the Spark Designer Panel. For more information on how to get your design accepted, check the following ink.
- Not for Sale: This means your design has not been accepted by the panel of designers and will not be available for customers to see and buy. You will still be able to buy your own design on any Spark product with Paypal or Credit Card.
- Available for Sale: Congratulations, your design has been approved and is available to the public to buy.
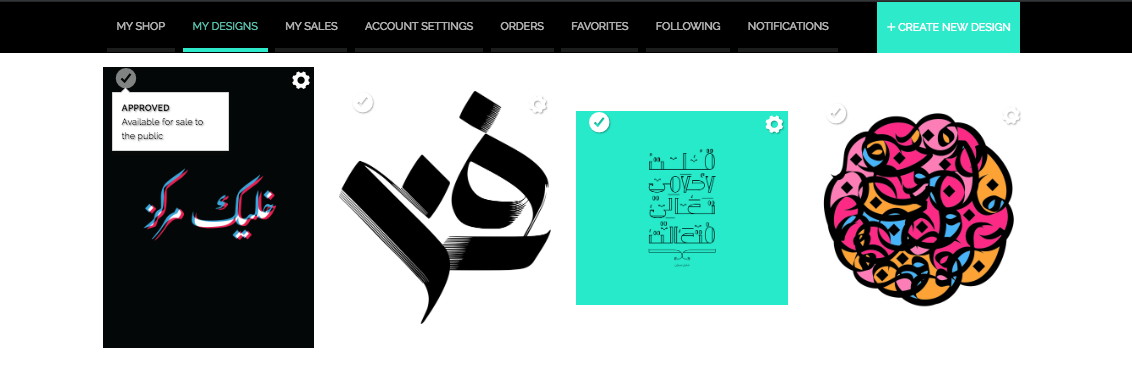
Editing / Changing Design Status / Deleting Designs
Finally, let’s talk about the cogwheel. Clicking on the cogwheel will pull up a sub-menu.
Delete: Deletes your design. Please note that deleting a work is permanent and cannot be undone. If a customer has already ordered your design, your design will not be deleted until order is completed.
Edit: Takes you to a page where you can re-adjust, update, and remove and add products for a particular design. You can also edit your design description, tags and design type. As you work through each of your designs, be sure to save!
Make Private: Makes your design private - no one will be able to view your design except you.